Friday, February 19, 2021

How to Track Anyone by Sending Them a Message

How to Track Anyone by Sending Them a Message 

1) Go to Grabify (https://grabify.link/) and make your account there by clicking on register.

2) Get the link (URL) of anything you want to send like  wallpaper, music, video, etc.

3) Now login to Grabify.

4) After loggin in to Grabify, go to home page. There you will see a box where you can paste url. So, paste the copied url in that box and click on create url.

5) After this, URL will be created and you will be redirected to the page where you will see new URLs.

6) Now copy the newly generated URL or google URL (anyone) and send it to that person whom you want to track. You can use any social media platform like Facebook, Whatsapp, Telegram or you can send directly to their phones as a sms.

Okay so here we have got the IP Address of the user whom we wanted to trace. Now let's get some more information about him/her.

So, to get information about user, copy the IP address of that person and go to IP2Location (https://www.ip2location.com/) and paste IP address there.

So, now just copy the Longitude and Latitude of the user that you got in the previous step and search it on Google, you will get map location.

Friday, June 5, 2020

How To Shorten The URL/Link

Have you ever tried to share a link of your post, document or anything and realized that sometimes website links (URL’s) are very long, other times, they are very short. Website urls are shorten for a variety of reasons. Shortening a URL makes it more visually appealing URL and also shortened links will fit in places where you have a limited number of characters to use, for example: Twitter. Some other times it is because we want to know how many people clicks the link. So for that purpose we need URL Shortener.

What is a URL Shortener?

A URL Shortener is basically a way to make a long URL (Uniform Resource Locator) shorter.  URL shortening services are Web tools (or services) that allow you to provide a long URL to a specific webpage and obtain a much shorter URL from the service provider.

Many URL shorteners can also give you information about who is clicking on your links and why. Keeping track of this information is one way to increase the visitors to your site.

Working of URL Shortener

A URL shortener works because of a Web server function called a “Redirect” (URL redirection). Basically the new URL (the short URL) will redirect users to the old URL (your long URL). URL shortners just generate a shortcode, map the target URL to the shortcode, and provide a new URL. Visiting the URL performs a database lookup with the shortcode as a key, and redirects you to the target URL.

When you enter a URL in a browser, this actually sends an HTTP command to the Web server directing it to fetch and transmit the requested Web page. There are a series of redirect HTTP response codes that a server can return, including the following:

- 301: (permanent) Returns a permanent redirect status indicating that the resource has moved permanently.
- 302: (temp) Returns a temporary redirect status.
- 303: (see other) Returns a "See Other" status indicating that the resource has been replaced.


How to shorten the links?

We are going to use a URL shortener to shorten the link. Fortunately, there is no shortage of companies offering URL shorteners these days, but they all have a slightly different angle, plan, or feature set.

The 6 best URL shortener services:

  • Bitly - Best for enterprise level businesses that need to track links.

  • Rebrandly - Best for small businesses looking to establish their brand.

  • Polr - Best for those that want to create and host their own URL shortener.

  • TinyURL - Best for casual users in need of a quick and easy link shortener solution.

  • BL.INK - Best for small businesses that want to share content in the form of short URLs.

  • ADF.LY - AdF.ly is a unique service because it not only helps to shorten links, but it also allows its users to make money just by using it. 

Saturday, May 30, 2020

How to Always Start Google Chrome in incognito mode on PC

Launching Chrome always in Incognito mode on Windows is quite easy. You must create a desktop shortcut by adding a simple Command Line to the default file target. And there's also a second way that if you want to open Chrome in Incognito mode, when opening a hyperlink (URL) from your e-mail or other program, then you have to modify the Registry.

Type 1: Using Command Line

If you want to always start Chrome in incognito mode, then create a new Chrome shortcut and modify it's properties, as follows:

Step 1. Right-click on Google Chrome shortcut and select Properties.


Step 2. Switch to the Shortcut tab within the Properties dialog box., add the switch "--incognito" (without quotes), at the end of the target line.

e.g. "C:\Program Files\Google\Chrome\Application\chrome.exe" --incognito


Step 3. The file path should then look like the one in the screenshot below. Click Apply and then OK to save your changes.


Step 4. From now on, when you start Chrome from the modified shortcut, the Chrome will open in incognito mode.

Note: If you want to stop the shortcut from launching in Incognito mode, just remove the 
--incognito’ command line from the Target field via Properties and save your changes.

Type 2: Using Registry

If you want to open Chrome in incognito mode, when opening a hyperlink (URL) from your e-mail or other program, then you have to modify the registry.  To do that:

Step 1. Open the Registry Editor
(Win+R >In the Run window, type REGEDIT, followed by Enter.)

Step 2. In registry, navigate to the following key:

HKEY_CLASSES_ROOT\ChromeHTML\shell\open\command

Step 3. At the right pane double click at the Default REG_SZ string value.


Step 4.  Add the switch add the word "incognito" (without quotes), before the "%1" and click OK.

e.g. Change the value data from:

"C:\Program Files\Google\Chrome\Application\chrome.exe" — "%1"


to:

"C:\Program Files\Google\Chrome\Application\chrome.exe" –incognito "%1"


Step 5. From now on, when clicking at a URL (HTML), Chrome will open it in incognito mode.

That's all friends! Did it work for you?

Please leave a comment in the comment section below or even better: like and share this blog post in the social networks to help spread the word about this solution.


Tuesday, May 26, 2020

How to Be (almost) Completely Anonymous Online

Absolute Online Anonymity Is A Myth

We live in a world of mass surveillance. You are being monitored and tracked directly or indirectly by governments, hackers, and corporations for their own different purposes(Not to mention how much of your personal data gets scooped up in all the breaches and hacks.). Some times online anonymity is nothing but a myth. No tool or service can guarantee you 100 percent anonymity without fail, but if you are smart and cautious, you can get pretty close. So as long as you are not running a drug cartel or committing acts of terrorism,and want to browse the web anonymously and not do anything too complicated, this guide should be enough for you and the vast majority of people to use the internet without leaving a trace.

1. Browse in Private/Incognito Mode Whenever Possible

Incognito Mode

Browsing in incognito/private mode is the simplest thing you can do to make some of your general internet usage a bit more anonymous. Your browser knows a lot about you, including the sites you have visited and the services you use. If you visit an unencrypted website (i.e. one that doesn’t include HTTPS in the URL), your network could also be exposed. That means usernames, passwords, and credit card numbers are openly visible and are at risk of being exploited.
Some websites also use the services of so-called tracking companies to monitor traffic. However, by installing a small piece of JavaScript on the site, people can monitor a lot more than just numbers of visitors.
The script is automatically downloaded and run when you open the page, and details such as your IP address, ISP, browser, and even screen resolution can all be monitored. While this may help web designers to create better websites, it's also possible to trace IP addresses to a general geographic location without ever having to go near your ISP's logs.
You leave cookies every time you visit a website. These cookies are stored on your computer and hold a modest amount of data based on what websites you’ve visited, allowing other web pages to deliver an experience tailored to you. That could be Facebook showing you an ad for that new Smart Phone or branded shoes you searched for on Google, or YouTube seeing that you’ve been looking up videos about the laptop or any health products. 
Just browse in private mode to avoid all that. All modern browsers have a private browsing feature, i.e, Incognito Mode/Private Mode, including on mobile.
Major browsers also have anonymous surfing modes. In Chrome it's called Incognito (Ctrl+Shift+N to access); in Firefox it's Private Browsing (Ctrl+Shift+P); and in Microsoft Edge and Internet Explorer it's In Private browsing (also Ctrl+Shift+P). Using it will prevent the browser from saving info on pages visited, whatever you search for—passwords, cookies, downloads, and cached content like images.


2. Avoid Google or Bing or Yahoo

Undoubtedly, Google is the leading search engine of the World Wide Web. However, the ‘personalized experience’ offered by the tech giant sometimes makes us all wary regarding our personal data and how the search engine itself is using it. Additionally, the personalization often becomes annoying when much of the tailored content and ads are targeting your unique interest.
Did you know that most search engines like, Google, Yahoo, and Bing collect and store the information you give them? For instance: your name, email address, telephone number, credit card, AND what you’re searching for. They each have published privacy policies that say exactly what they’re collecting, what they use, and what they do with that information. Simply, search Privacy Policies, or we got the info below (1, 2, 3). The policies tell you they can share your information with partners, third parties, or law enforcement.

So to avoid being tracked when searching on the web, we recommend you use a service like DuckDuckGo. This an independent search engine which doesn’t give you personalized search results. Everyone who searches sees the same results, and anything you search for won’t be collected or stored. The search engine also claims it has nothing to sell to advertisers, which means you won’t ever be subject to targeted ads seen when using Google and other websites.

DuckDuck Go

3. Hide Your IP address And location

One of the main reasons that people hide their IP addresses is so that they can download illegal material without being tracked. But there are a lot of other reasons you might want to hide it. Another reason is geographic restrictions and censorship. Some content is blocked by the government in certain areas, such as in China and the Middle East. If you can hide your real IP address and make it look like you’re browsing from another region, you can bypass these restrictions and view blocked websites and its contents. Private companies also often geo-lock their content, making it unavailable in certain countries.

And the most genuine reason to hide your IP address is simply for more privacy and to prevent misuse of your personal information. Whenever you access a website, the server you connect to logs your IP address and attaches it to all the other data the site can learn about you: your browsing habits, what you click on, how long you spend looking at a particular page. They then sell this data to advertising companies who use it to tailor ads straight to you. This is why ads on the internet sometimes feel oddly personal: it’s because they are. Your IP address can also be used to track your location, even when your location services are turned off. Just do a IP Lookup, it will give you the location of the area of your city where you live, it won’t give out your actual home address or name to everyone, anyone with access to your ISPs customer data can find you fairly easily.

So How to Hide Your IP Address?

The two primary ways to hide your IP address are using a proxy server or using a virtual private network (VPN) and third most importantly is to use TOR.

a- Proxy Server

A Proxy acts as a gateway – it’s ideal for basic functions like anonymous web browsing and managing (or circumventing) content restrictions. Proxy servers excel at IP masking and misdirection, making them good for viewing geographically limited content. They allow users to bypass content restrictions and monitoring, or enforce website content restrictions – so that you can’t log into certain web pages on company time.

b- VPN Client

VPNs are not anonymous. There is literally nothing anonymous about using a VPN. No anonymity here. Did we mention VPNs don't offer anonymity? Just wanted to make sure we're clear on this point. All a VPN does is move trust from your ISP or, if you're traveling, your local coffeeshop or hotel or airport WiFi network to someone else's server. There are many legitimate security reasons why using a VPN is a great idea, but anonymity is not on that list. Anywhere. Not even at the bottom.
A VPN client on your computer establishes a secure tunnel with the VPN server, replacing your local ISP routing. VPN connections encrypt and secure all of your network traffic, not just the HTTP or SOCKS calls from your browser like a proxy server. A VPN helps you maintain anonymity by hiding your real IP and internet activity from prying eyes.
VPNs are best when you need to use the WIFI at public like airport, coffee shop etc., using a VPN instead of the potentially completely unencrypted local WIFI adds another layer of privacy – who knows who is lurking on that network. 


Tor Browser

Tor is possibly the most effective method to keep your data secure on the internet. The Onion Router (TOR) is the software side of anonymity. When you download Tor to your device, you gain access to Tor’s nodes. You use Tor when you don’t want anyone to know where you are, including the services you’re using. It’s as close to one-click privacy as you can conveniently get. 
When you use Tor, your data is stripped of identifying info, encrypted with layers, then relayed to another node. There, one of the layers on your data is decrypted, then it’s relayed again. When your data reaches its destination, it’s impossible to identify its origin (in internet terms) or your physical location, thereby protecting your internet activity which includes “visits to Web sites, online posts, instant messages, and other communication forms”.

Working Of TOR

But what it has in security, it lacks in speed: Tor is comparatively slow.
You can even improve TOR by using it in combination with a compatible VPN. It is important to note, though, that using TOR won’t hide the fact that you’re using it. Some sites may restrict allowances made through TOR.
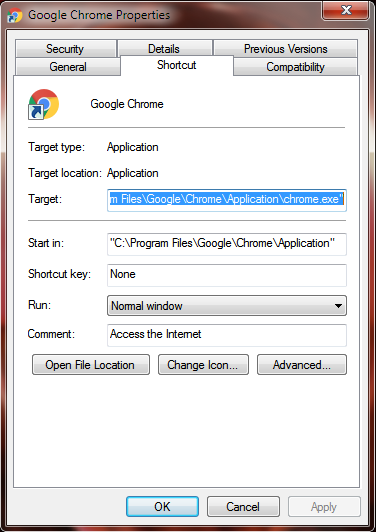
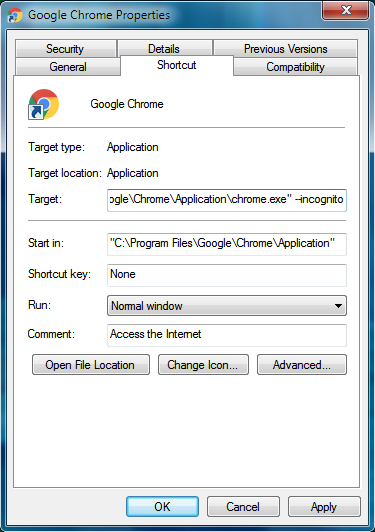
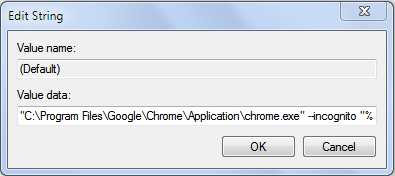
4. Never Log In

Now you can access the web anonymously via Tor. You are now free to browse, but whatever you do, never log in. Don’t check your Email or Facebook or Twitter. Don’t buy stuff on Amazon, Ebay etc. Just to be safe, don’t even use Google.

Even though your internet traffic is anonymized by Tor while it’s in transit, logging into an account that you created while off the Tor network is just the sort of slip up a snooper is looking for. The website or service that you log into can easily track everything you do on its site, even with the Tor Browser enabled.

If you want to anonymously access a website or service that requires you to sign in, then you first need to create an entirely new account while connected to the Tor Network. With a fresh account created while inside the Tor Browser, you can avoid any activity being corroborated with your other, identifiable account. If you create an account on the Tor Network, you should only access it on the Tor Network. You don’t want to go through the trouble of creating accounts on the Tor Network and then spoiling your efforts by logging into those same accounts later on Chrome. What happens on Tor stays on Tor.

5. Secure Messaging Apps

If you need to use an online messaging app, you should know that the popular ones aren’t as secure as you’d like them to be. True, Facebook messenger does have a “secret conversation” feature but Facebook hasn’t exactly been the most secure social network to begin with. Same thing is about WhatsApp, Saying WhatsApp is trustworthy because it offers end-to-end encryption is as naive as claiming that the NSA doesn't spy on you because it's illegal. WhatsApp is underperforming in every conceivable digital privacy category. WhatsApp has made loud noises about end-to-end encryption that ensures that only you and the person you're communicating with can read what's sent. However, that encryption does not work if the data is stored as a backup on Google Drive. WhatsApp had recently signed a pact with Google to allow its users to store messages on the search giants' cloud storage offering.

Instead, use tools like Signal or Telegram. These apps use end-to-end encryption and can even be used to make voice calls. These encrypted messaging apps can stop people from snooping on your conversations.

Signal is the best-of-breed encrypted messaging app that lets you send text messages and voice memos as well as voice calls and audio calls. It looks and feels just like any other messaging app but under the hood uses encryption that, to the best of our knowledge, not even the National Security Agency can brute-force.
Signal
Telegram is a cross-platform messaging tool. There are clients available for iOS, Android, Windows Phone, Windows, macOS and Linux (32- and 64-bit variants). The service uses the MTProto encryption protocol, but not everything is encrypted in the same way. The bulk of messages are stored in Telegram's cloud servers and are encrypted on the server. Only Secrets Chats – of which more in a moment – are securely encrypted on sender and recipients' devices to ensure complete privacy.

Telegram

6. Virtual machines

A virtual machine (VM) is a fake computer running inside your real computer. Each VM gets to use a chunk of your computer’s memory while it’s running and has its own virtual hard drive, which is just a file on your real hard drive. You can install operating systems in them and you can install and run software in them.
In virtualization lingo, the operating system that you’re running right now is called your “host,” and every VM that you run is a “guest.” If a guest VM gets hacked, your host remains safe. For this reason, security researchers often use VMs to study viruses: They unleash them on their guest VMs to safely monitor what they’re trying to do and how they work, without risking their host computer. They “isolate” the viruses from the rest of their computer.
You can try VirtualBox which is available on Windows, Linux, and Mac.

7. Keep Your Email Secret

The simplest way to anonymously send email is to use a webmail service in the Tor Browser. Of course, that requires signing up for a new webmail account without revealing any personal information, a difficult task given that Gmail, Outlook, and Yahoo! Mail all require a phone number. Your email address is a big part of your online identity. It's also a valuable source of revenue for people whose business involves supplying spammers with live addresses. If the sites you register with aren't secure, hackers can access the database containing all the user credentials, and the email addresses are sure to be sold on.
Sure, popular messaging services like Gmail use HTTPS and contain the SSL certificate used to authenticate and encrypt your messages, but that doesn’t mean they’re 100% private. Google’s even admitted to reading user emails to better target ads. Gmail can and does read every single one of your emails.
If you are not comfortable giving Google unlimited access to all of your intimate communications, then ProtonMail’s approach to data privacy provides more security.

ProtonMail

ProtonMail’s encryption means that nobody but you can read the messages in your mailbox. In fact, not even ProtonMail has the ability to read your messages. ProtonMail uses zero-access encryption, which means it is technically impossible for them to decrypt user messages. Zero-Access Encryption applies to all messages in your mailbox, even messages which did not come from other ProtonMail users. This provides stronger security compared to Gmail because even if ProtonMail were somehow breached, user messages remain secure because ProtonMail only stores encrypted messages.
In other words, if an attacker steals emails from ProtonMail, the attacker would not have the ability to decrypt them, as even ProtonMail cannot decrypt them. The use of Zero-Access Encryption, therefore, adds a strong layer of resiliency against catastrophic data breaches.

Burner Email
And if you’re looking to use an email for only a short period of time, you can use a disposable/burner email account to avoid these problems. These types of email accounts exist for only a short period of time – just long enough to complete a registration process. GuerrillaMail offers this type of service and is free and easy-to-use.

Guerrilla Mail

Guerrilla Mail, a temporary, disposable email service. Guerrilla Mail lets you set up a new, random email address with only a click. Using it in the Tor Browser ensures that no one, not even Guerrilla Mail, can connect your IP address with that ephemeral email address.

10. Large File Transfers

Google Drive and Dropbox don’t promise much in the way of privacy. 
OnionShare solves this privacy problem and is incredibly easy to use. Micah Lee, Director of Information Security at The Intercept developed OnionShare.

OnionShare

Onionshare, an open-source software that lets anyone directly send big files via Tor. When you use it to share a file, the program creates what’s known as a Tor Hidden Service—a temporary, anonymous website—hosted on your computer. Give the recipient of the file the .onion address for that site, and they can securely and anonymously download it through their Tor Browser.

11. Leave no trace on a computer with TAILS

Achieving anonymity while browsing the internet is the main concern for many people; everybody wants to make their communications secure and private. However, few in the world have really achieved this objective and many are still facing difficulties and trying different techniques to achieve online privacy.
If so, it’s time to learn about the operating system called TAILS

TAILS

TAILS or The Amnesic Incognito Live System is a security-focused Debian-based Linux distribution aimed at preserving privacy and anonymity. All its outgoing connections are forced to go through Tor and non-anonymous connections are blocked.
TAILS is a special computer operating system. It is designed to help you use the Internet anonymously and get around censorship. Tails is a live system (live operating system) that runs from a USB stick or DVD. It lets you connect to the Internet using virtually any computer, while leaving no trace of your activities after you are done.
Tails is free software that anyone can install and use whenever and wherever privacy and anonymity are important.

When whistleblower Edward Snowden was communicating with Glenn Greenwald back in 2013 about the goings on at the NSA, one of the tools he used to protect himself was Tails.

TAILS is continually being updated and patched to stay on top of vulnerabilities and continue to improve security so that it can guarantee no trace will be left. It doesn’t have the power or storage options of a traditional operating system like Windows, but there’s nothing more private.

12. Stay Secure and Up-to-date

Here this article didn’t focus much on security as the emphasis is more on how to maintain anonymity. However, a gap in security could expose your activity to a third party. It’s important to keep all of your apps and operating system up to date at all times. Don’t put off updates because most of them include security patches. 

  • Use antivirus. Regular scans and real-time monitoring will go a long way in protecting you from malware.

  • Enable your PC's firewall. A firewall is the best defense against unsolicited connections from snoopers.

  • Secure your wifi router. Change the default username and password, disable WPS, use WPA2 encryption, and enable the NAT firewall.

  • Secure your PC's webcam. Just put tape over it.

Finally, remember that these tools won’t protect you from yourself. If someone is actively trying to track or monitor your online activity, they are much more likely to find you as a result of human error, not by cracking encryption or running traffic analysis on the Tor network.

Sunday, May 24, 2020

How To Open Chrome In Incognito Mode By Default On Android

Chrome's Incognito Mode gives you a layer of privacy when browsing. While it's enabled, your browsing history, cookies, site data, and lots of other  information entered in forms is not saved, making it perfect for more private web usage. So, it basically gives you a layer of privacy when browsing. With an Android smartphone, you can jump right into this mode.

Incognito Mode

The Incognito Mode is also available on Chrome for Android, and users can open it in just a few steps. To open Incognito mode on Chrome for Android, tap on the three vertical dots in the upper right corner and then select ‘New Incognito Tab’. This is the default way to open Incognito mode in Google Chrome for Android.

Want a faster way? Just follow the following steps to open Incognito Mode in chrome in single click.


Step 1. First of all, download & install the Google Chrome browser on your Android smartphone.


Google Chrome

Step 2. Now on the home screen, long press on the Google Chrome icon.

Step 3. You will see two shortcuts — Incognito Tab and New Tab.

Incognito Mode Shortcuts

Step 4. You need to long-press on the ‘Incognito tab’ and then drag the shortcut to the home screen. The new Incognito tab’s shortcut will look like these.

Incognito Mode Icon


Step 5. Now drag and drop the shortcut file wherever you want.

That's it! From now on, just click this icon to open Chrome in incognito Mode.

Friday, May 22, 2020

5 Best Photo Viewer Apps For Windows 10 (2020)


Few years back, if you wanted to view photos stored on your computer, the best photo viewer for Windows was the one built-in. It was aptly named Windows Photo Viewer.
With time the software got old and newer third-party alternatives for Windows Photo Viewer started to pop-up. Microsoft also brought the new Photos app to Windows 10 (and Windows 8) that now does the job of handling all your pictures and videos, and some video editing on the side. If you’re looking for the best photo management software, this article might help you find the one that suits you best. Let’s take a look at 10 programs for photo managing that are compatible with Windows 10. Some of the apps mentioned in the list also work on older versions as well.

#How to set a default photo viewer

Just a heads up, installing a third-party photo viewer app isn’t going to be enough. You also have to make it your default Photo viewer app. To do that on Windows 10, head over to the search bar and type Default. Next, go to Default Apps Settings > Photos. Now you can select any Photo viewer as your default image viewer.

1. Google Photos

Google Photos


If you’re looking for the best free photo management software, you should give Google Photos a shot – the app has an overall App Store rating of 4.7 stars! Especially if you are familiar with Google services. If you’ve ever used Google Drive, it will be very easy for you to understand the interface. Using this service, you can store an unlimited number of photos and videos in reduced quality. Another option is to 12 GBs of free storage in high quality – it’s up to you to choose. Google Photos connects to Google Drive and allows you to share photos via links with customizable options. So, you can share your photos and prohibit or allow viewers to make changes.
Google Photos is not your regular photo viewer for Windows, but it can be a very helpful tool in today’s age of cross-device experience. What I mean is most of us click photos using our phones. With Google Photos, you can store all the pictures and videos on the cloud and access them anytime on your PC or phone.
One of the USPs of Google Photos is the search bar. Well, I don’t need to tell you about the power of Google’s Search. So, you can simply type, “show photos of me at the beach,” and it will display the relevant photos on your screen. It is completely free to use. All you need to do is save the Google Photos website as a PWA. You can upload images from your computer using Google’s Backup & Sync tool.

Google Photos Link:- Google Photos

2. Windows Photo Viewer

Windows Photo Viewer

Windows Photo Viewer (formerly Windows Picture and Fax Viewer) is an image viewer included with the Windows NT family of operating systems. It was first included with Windows XP and Windows Server 2003 under its former name. It was temporarily replaced with Windows Photo Gallery in Windows Vista, but has been reinstated in Windows 7. In Windows 10, it is deprecated in favor of a Universal Windows Platform app called Photos, although it can be brought back with a registry tweak. Windows Photo Viewer can show individual pictures, display all pictures in a folder as a slideshow, reorient them in 90° increments, print them either directly or via an online print service, send them in e-mail or burn them to a disc. Windows Photo Viewer supports images in BMP, JPEG, JPEG PNG, ICO, GIF and TIFF file formats.

Windows 10 uses the new Photos app as your default image viewer, but many people still prefer the old Windows Photo Viewer. You can get Photo Viewer back in Windows 10, though. It’s just hidden.

Activate Windows Photo Viewer on Windows 10


3. IrfanView 

IrfanView

IrfanView is an image viewer, editor, organiser and converter program for Microsoft Windows. It can also play video and audio files, and has some image creation and painting capabilities. IrfanView is free for non-commercial use; commercial use requires paid registration. IrfanView is named after its creator, Irfan Å kiljan. IrfanView is specifically optimized for fast image display and loading times. It supports viewing and saving of numerous file types including image formats such as BMP, GIF, JPEG, JPEG2000, PNG etc. It edit and convert images in an easy to use, yet powerful professional-grade software. IrfanView is a well featured image editor, with lots of options, yet they are sensibly arranged and easy to get to at speed. As a result, IrfanView can be used to produce good results really quickly. Plug-ins mean you can add specialist features without the whole application becoming bloated with features many people will never use.

Download IrfanView:- Irfan View


4. FastStone Image Viewer 

FastStone Image Viewer

FastStone Image Viewer is a fast, stable, user-friendly image browser, converter and editor. It has a nice array of features that include image viewing, management, comparison, red-eye removal, emailing, resizing, cropping, retouching and color adjustments. Other features of FastStone Image Viewer include a high quality magnifier and a musical slideshow with 150+ transitional effects, as well as lossless JPEG transitions, drop shadow effects, image annotation, scanner support, histogram and much more. FastStone Image Viewer supports all major graphic formats (BMP, JPEG, JPEG 2000, animated GIF, PNG, PCX, PSD, EPS, TIFF, WMF, ICO and TGA) and popular digital camera RAW formats (CRW, CR2, NEF, PEF, RAF, MRW, ORF, SRF, ARW, SR2, RW2 and DNG).

Download FastStone Image Viewer:- FastStone Image Viewer


5. XnView

XnView

XnView is an image organizer and general-purpose file manager used for viewing, converting, organizing and editing raster images, as well as general purpose file management. It comes with built-in hex inspection, batch renaming and screen capture tools. With initial support for only Unix systems, Xnview is now available as a photo viewer for Windows 10 as well. It is not just an image viewer but a photo organizer and editor too. XnView is a robust software and supports multiple languages. The image viewer has an Explorer-like browser that allows browsing of directory contents. XnView supports red eye correction, crops and transforms JPEG images lossless, generates HTML pages and contact sheets, and provides batch conversion and batch renaming. Slide shows with transitions effects, screen capturing, WIA and TWAIN support (scanner and digital cameras), image comparison, and file operations.

Download XnView:- XnView


6. HoneyView

Honeyview

Honeyview is a very fast image viewer supporting various formats. It also supports viewing the images in compressed ZIP, RAR, or 7z files without extraction. If an image has GPS information, the location can be viewed on Google Maps, and users can store preferred photos. When it comes to image viewers, Windows users can select from a wide variety of free and commercial tools: from XnViewer and FastStone Image Viewer to Irfanview or the commercial FastPictureViewer Professional. HoneyView, It is a well designed program that delivers exactly what you'd expect from an image viewer. Honeyview is a fast image viewer for Windows with excellent image format support and options that make it interesting for quick reviews of large photo collections. While it is no FastPictureViewer Professional, it should be suitable for most home uses.

Download HoneyView:- HoneyView


7. ImageGlass

ImageGlass

ImageGlass is a lightweight, versatile image viewing application that is designed to take the place of Photo Viewer in Windows 7 and Vista, especially those installations that may have trouble displaying PNG and GIF files in Photo Viewer. ImageGlass loads images faster than Photo Viewer, thanks to a feature that uses RAM to preload the next image. It also lets you quickly resize and reorient images in the main display. ImageGlass is a simple picture viewer with which you will be able to display your image collection in a very similar way to the one that Windows provides by default, but with some additional functions. This application will allow you to better manage your pictures thanks to the options it includes and the extension it enables to install for adding more functions and widening its possibilities.

Download ImageGlass:- ImageGlass


8. Nomacs


Nomacs 

Nomacs is a free, open source image viewer, which supports multiple platforms. You can use it for viewing all common image formats including RAW and psd images. The program includes image manipulation including rotate, adjusting brightness, contrast, saturation etc. and includes a pseudo color feature for creating false color images. The program can view images inside archives or MS Office files. It will even synchronize multiple instances to allow image comparison of the same position on different images. A synchronization of viewers running on the same computer or via LAN is possible. It allows to compare images and spot the differences.

NOTE: the latest version is only available for 64-bit Windows. An earlier version (2.4.6) is available from the website for 32-bit and Windows 2000/XP/Vista. Clients also available for Linux, FreeBSD, Mac, and OS/2.

Download Nomacs:- Nomacs


9. Movavi Photo Manager

Movavi Photo Manager

Movavi Photo Manager is an excellent photo manager with a simple and modern interface. Movavi Photo Manager will help you manage your entire photo collection, including images in RAW, JPEG, PNG, and many other formats. Movavi’s photo organizer will be an essential tool for anyone who values their time as much as their photo collection. Movavi’s photo organizer will automatically sort your images by date and GPS coordinates and let you add unique tags to your photos, detect duplicate photos and provide you with basic editing tools to crop, flip, rotate, straighten, and more.
You can edit them together, add them to an album, or choose the best and delete the rest. It works with individual photos or edit multiple photos simultaneously. It also add tags to image files using Movavi's picture organizer so you can easily navigate around your photo library. It review the automatically created photo albums sorted by country and filter images in these albums by city. Quickly find and remove duplicate photos from your hard drive to free up disk space. You can also delete duplicates from any list of photos added to the app. You can view photos in many popular image formats using Movavi’s fast and reliable picture organizer.

Download Movavi Photo Manager:- Movavi Photo Manager


10. FocusOn Image Viewer

FocusOn Image Viewer

FocusOn Image Viewer is a freeware app designed to view and edit your photos quickly. It is intended to be a one-stop photo manager. You can automatically organize your pictures by date, edit photos without loss of quality, and even share your pictures on your favorite social media sites, including Twitter and Facebook.

Over 100 image formats supported including JPG, PNG, GIF, BMP, TIF, JP2, J2K, PSD, DNG, RAW, and more. You can organize your images in an Explorer-type interface with thumbnails, and drag and drop are supported. A simple image editor is easy to find and use so you can resize or rotate quickly. You can view image details through the zoom and edit image with a crop, filter, adjust, and other functions without damaging the original. The edited image can be shared with others by publishing on the Blog, Twitter, Facebook, or can be organized automatically.

FocusOn Image Viewer has plenty of features and options to manage and edit your photos without having so many tools that it's over complicated. It instead focuses on precisely what it promises - total management of your photo collection. 
It can be used for personal and professional gains. Focus more on your photos with FocusOn Image Viewer.

Download FocusOn Image Viewer:- FocusOn Image Viewer

Summary:-
These were the 10 Best Photo Viewer for Windows 10. All of them deserve to be on your computer based on your personal requirement. However, you cannot install them all together so I’d suggest you to try them all one by one until you find a perfect match for you. Hope I helped you in the manner you wished for.

Tuesday, May 19, 2020

How To Remotely Access And Control Your Computer

1:- Team Viewer

Team Viewer is a very popular software to access any computer remotely. Whether you want to access your home computer from anywhere or connect to a friend’s machine to help them out, TeamViewer is a great option. The great thing about TeamViewer is that during remote access, the software allows users to start a text and voice chat.


Here’s a complete guide on how to use Team Viewer, including how to set up unattended access and some Team Viewer tips along the way.

Step 1. Download and install Team Viewer software on both your home computer and remote computer.. Both computers must be connected to the internet.

Step 2.  Now it will display User Id and Password. If you want your partner to access your computer, then send him/her your user id and password. Start it up and create an account by going to Connection > Set Up Unattended Access. This will make all your computers accessible over the internet with just a quick username and password combination.

Step 3. If you want to access someone’s computer, then get the Username and password of Team Viewer of that computer. Now click on Connect To partner and type User ID of partner and then it will ask for the password. Fill in the password and press enter.

Step 4. Now it will start connecting your computer to another computer, and finally, you can remotely access any computer. By this method, you can undoubtedly have remote access to another computer.


2:- Microsoft's Remote Desktop Connection

Remote Desktop Connection (RDC) is a Microsoft technology that allows a local PC to connect to and control a remote PC over a network or the Internet. 
If you are running a Windows-based computer or similar device, you can connect to another one using Remote Desktop Connection. This application uses the RDP (Remote Desktop Protocol) by which you can control another Windows PC from your computer, remotely on your local network or even over the internet.

Step 1. You need to browse My Computer > Properties > Advanced system settings.


Step 2. Now select the tab named “Remote” and then make sure to enable the option of “Allow connections only for computer running Remote Desktop with Network Level Authentication.”


Step 3. Now whenever you or your family members want to work on your computer from different locations, you need to open Remote Desktop and have to enter the Name or IP Address of your computer.


That’s it now you can easily access your computer from anywhere all you just need to enable the inbuilt function of windows named Remote Desktop Connection.


3:- Remote Computer Access Using Google Chrome

A:- Accessing computer remotely using Computer

Chrome Remote Desktop is a pretty good tool to use to enable remote connections to your computer. It’s easy to set up, requires minimal resources, and works with major operating systems available. Chrome Remote Desktop requires a bit of a configuration before you can start using it on your computers. This is just a one-time setup and once you’ve done it, you can then use it the next time without configuring anything at all.


Step 1. First, download the extension Chrome Remote Access on your Google Chrome.

Step 2. Now, this app will get added to your Chrome, and you can see it at the right uppermost corner. Click on it and click continue.
Now it will ask to allow access to data, proceed with allowing access to it.

Step 3. Now it will ask you to connect to another computer or share your computer. Now if you click on share this computer then it will generate a code.

Step 4. Send the code to the partner with whom you want to access your computer. Note that other computer must have the same app installed on its computer. Now your partner will enter his code, and your desktop will get the share to him exactly the same as you can see yours.

Step 5. By this, anyone having access code can access your computer remotely, and even you can access someone else’s computer by having access code of it.
To end a sharing session, click Stop Sharing.

B:- Accessing computer remotely using Android:-

To get started with this remote access application, below are the pre-requisites;
• Install chrome browser on the PC
• An Android smartphone or tablet

On your Android phone or tablet, open the Chrome Remote Desktop app. 
If you don’t have it, download it from Google Play Store.
 
After installing, fire up Chrome on your computer and install the Chrome Remote Desktop Chrome App from the Web Store
  • To get this service up and running, first you need to open the Chrome desktop app and enable remote connections; your desktop or laptop should be listed under "My Computers."
  • To provide access to this particular computer, users must create a PIN of at least six digits. This PIN number will be required from the smartphone or tablet.
  • On your Android device's screen, your shared laptop or desktop should be visible. Tap on it, and the app will ask for the PIN number used on the host PC.
  • After that, you should see your desktop on the mobile Android device. Even more, a box stating that "your desktop is currently shared with {Your Computer Name} should be positioned at the bottom of the computer's screen.

That's it; setting up the connection is super easy and super fast. Once the setup is completed, users can swipe their finger across the smartphone or tablet screen to move the mouse pointer. For your security, all remote desktop sessions are fully encrypted

If you want to remove a computer from your list then do the following steps:

  • On your Android phone or tablet, open the Chrome Remote Desktop app.
  • Touch and hold the computer you want to remove.
  • Tap Delete.
  • Tap Ok.

How to Track Anyone by Sending Them a Message

How to Track Anyone by Sending Them a Message  1) Go to Grabify ( https://grabify.link/ ) and make your account there by clicking on registe...